Exploring the Cockpit of Airliners 6.7 Landing Operations
The aircraft continues to descend along the glideslope, and the pilot continues to monitor the status of the Automatic Flight Director System (AFDS).
When the Radio Altitude (RA) reaches 500 feet, the First Officer calls out the current values: “500, Vref+5, Sink 700”.
Here, “500” refers to 500 feet AFE (Above Field Elevation). In sparsely populated areas, the Minimum Safe Altitude is regulated at 500 feet, making the 500-foot mark a very important indicator. “Vref+5” refers to the current speed being exactly 5 knots above the reference speed for 30 degrees of flaps. The setting of Vref was explained in the 5.2 Approach Briefing section. “Sink 700” refers to the current vertical Descent rate of 700 feet per minute. Below 1000 feet AFE, the aircraft’s sink rate is required to be under 1000 fpm, so the current 700 is within limits.
After passing 400 feet, the aircraft’s horizontal tail trim begins to automatically move rearward. While the aircraft’s altitude and pitch attitude remain unchanged, the automatic flight system has already begun preparing for the flare before landing.
Next, as the aircraft approaches the Decision Altitude (DA), the First Officer calls out: “Approaching Minimum”.
The Captain replies: “Checked”.
Immediately after, the aircraft reaches the Decision Altitude, and the First Officer calls: “Minimum”.
If visibility is satisfactory at this moment, the Captain calls “Landing”,
indicating that the aircraft will continue with the landing rollout procedure.
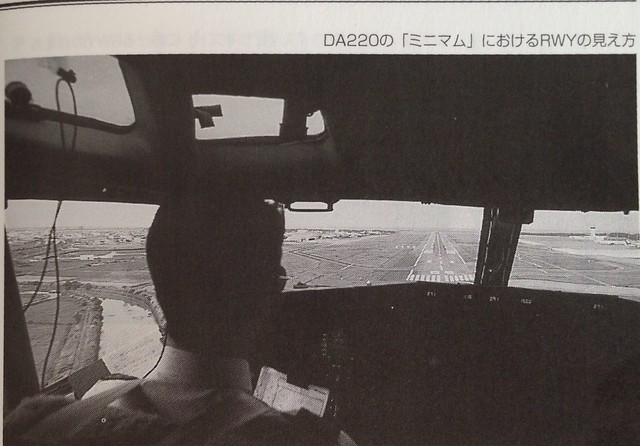 The image above shows the view of the Runway from the cockpit at DA 220.
If the pilot cannot clearly see the Runway at the Decision Altitude, the Captain calls “Go Around”, and the crew must immediately execute the Go Around procedure introduced in the previous section.
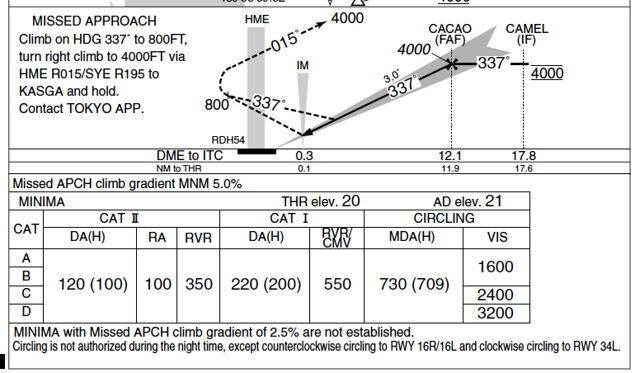 Taking the ILS Approach to Runway 34L at Tokyo International Airport (shown above) as an example:
Category I standards require a Decision Altitude (DA) of no less than 220 feet and a Runway Visual Range (RVR) of no less than 550 feet.
Category II standards require a Decision Altitude (DA) of no less than 120 feet and a Runway Visual Range (RVR) of no less than 350 feet.
Runways, airlines, and aircraft certified for Category II operations require higher maintenance capabilities and stricter standards than Category I,
and pilots must possess the corresponding qualifications to operate Category II instrument landings.
Taking the ILS Approach to Runway 34L at Tokyo International Airport (shown above) as an example:
Category I standards require a Decision Altitude (DA) of no less than 220 feet and a Runway Visual Range (RVR) of no less than 550 feet.
Category II standards require a Decision Altitude (DA) of no less than 120 feet and a Runway Visual Range (RVR) of no less than 350 feet.
Runways, airlines, and aircraft certified for Category II operations require higher maintenance capabilities and stricter standards than Category I,
and pilots must possess the corresponding qualifications to operate Category II instrument landings.
According to the landing rollout procedure, pilots generally need to disconnect the autopilot and hand-fly the aircraft, but there doesn’t seem to be a strict standard for exactly what altitude or stage to begin this. Often, it is determined by the pilot’s own preference and habit. The materials I have on hand describe it this way (using a Boeing 737-500 as an example): At an altitude of DA minus 50 (which would be before 170 feet in the Tokyo International Airport example), the pilot needs to disconnect autothrottle and the autopilot, and manually perform the landing operation.
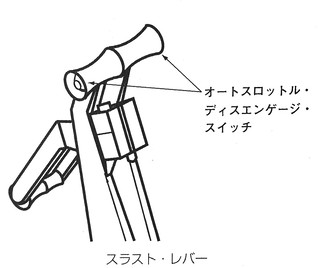 Above: Thrust levers and the Autothrottle disconnect switch position
 Above: The button indicated by the top-left arrow: Autopilot disengage switch
When the Radio Altitude (RA) reaches 100 feet, the Ground Proximity Warning System (GPWS), linked to the radio altimeter, automatically broadcasts electronic warning calls, continuously announcing the current altitude: “One Hundred” “Fifty” “Forty” “Thirty” “Twenty” “Ten”
The aircraft’s height when crossing the Runway Threshold should be RA 50 feet. Prior to this, the aircraft must maintain a constant 3-degree glideslope. After 50 feet, the Flare maneuver begins, and the aircraft’s Descent rate gradually decreases. The aircraft’s Flare begins when the landing gear is 15 feet above the ground. The aircraft’s pitch attitude reaches a nose-up 3 degrees, allowing the aircraft to achieve the target touchdown sink rate of 150 feet per minute. Simultaneously, during the Flare, the pilot must smoothly reduce engine Thrust, so that the engines reach idle exactly at the moment of touchdown.
Pilots with experience flying small propeller aircraft might ask: Starting the Flare from 15 feet and pulling up to a 3-degree pitch attitude, then reducing Thrust only after flaring— wouldn’t the airplane float up due to ground effect (ballooning)? When landing small airplanes, pilots generally reduce Thrust first, and then initiate the Flare after sensing the aircraft starting to sink. However, for airliners, the mass is much greater than small aircraft, so the inertia is also much larger. Using the same control technique as for small aircraft would undoubtedly result in a heavy impact, known as a “hard landing.”
Therefore, airliner pilots can basically achieve a safe landing by following the 3 steps above:
- Flare at 15 feet above the Runway.
- Pitch up to 3 degrees.
- Retard Thrust Levers to idle. Of course, this is just talk on paper; it sounds simple but is much more difficult in actual operation. Without a lot of hard practice and experience honing actual flight skills, achieving a perfect landing is absolutely impossible.
After the main landing gear touches down, you can hear the friction sound between the tires and the ground,
and the airframe shakes slightly due to contact with the Runway.
The Captain gently pushes the control column forward to lower the nose wheel onto the Runway,
then applies the rudder pedals (rudder) to keep the aircraft rolling along the Runway centerline.
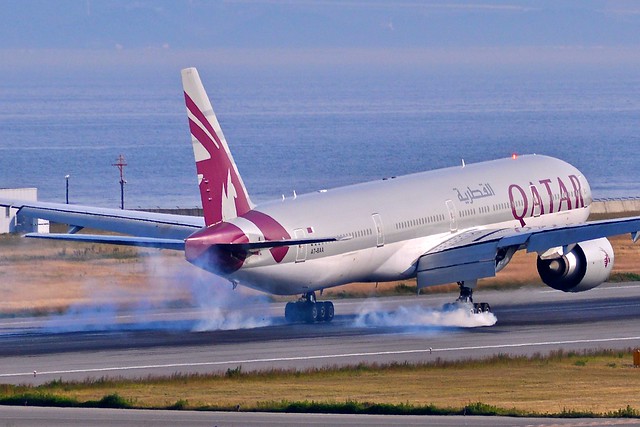 When the tires touch the ground, they collide violently with the surface, generating massive friction heat that burns the tire surface.
Therefore, at the moment of landing, blue smoke can often be seen rising from the landing gear,
leaving long black skid marks on the Runway.
(Photo above taken at Osaka Kansai International Airport)
When the tires touch the ground, they collide violently with the surface, generating massive friction heat that burns the tire surface.
Therefore, at the moment of landing, blue smoke can often be seen rising from the landing gear,
leaving long black skid marks on the Runway.
(Photo above taken at Osaka Kansai International Airport)
After the main landing gear touches down, as long as any of the left or right wheels start spinning,
the Speedbrake Lever automatically moves to the UP position.
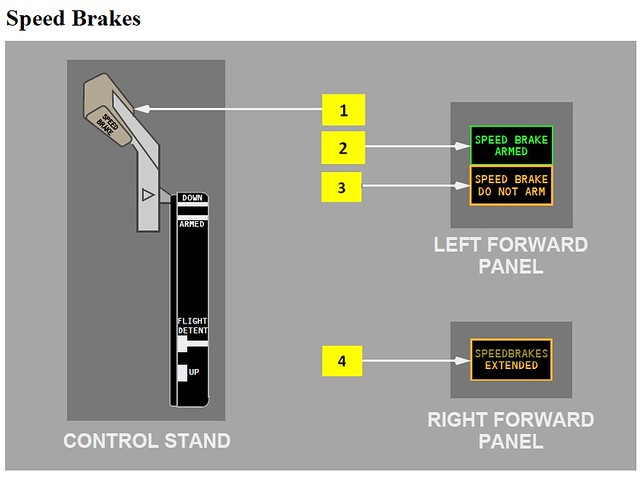

At the same time, the Speedbrake (also known as Flight Spoilers, position 10 in the image below) located on the inboard section of the wings automatically deploys.
 Next, as the weight of the aircraft presses down on the tires, the air ground safety sensor installed on the landing gear’s telescopic strut
determines that the aircraft is on the ground based on the compression state of the Oleo Strut.
Consequently, the system automatically deploys the Speedbrake on the outboard section of the wings (ground spoilers, position 9 in the image above).
Speedbrakes serve to increase air Drag, reducing the aircraft’s speed and Lift.
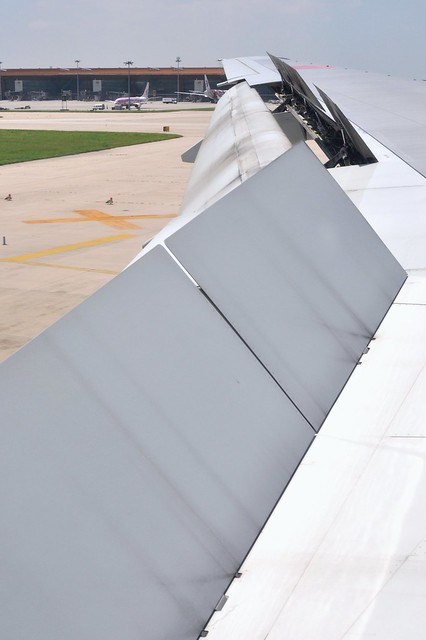
Speedbrake of a Boeing 777 (photographed at Beijing Capital International Airport):
Next, as the weight of the aircraft presses down on the tires, the air ground safety sensor installed on the landing gear’s telescopic strut
determines that the aircraft is on the ground based on the compression state of the Oleo Strut.
Consequently, the system automatically deploys the Speedbrake on the outboard section of the wings (ground spoilers, position 9 in the image above).
Speedbrakes serve to increase air Drag, reducing the aircraft’s speed and Lift.
Speedbrake of a Boeing 777 (photographed at Beijing Capital International Airport):
 Speedbrake of an Airbus A320 (photographed at Tokyo Haneda Airport):
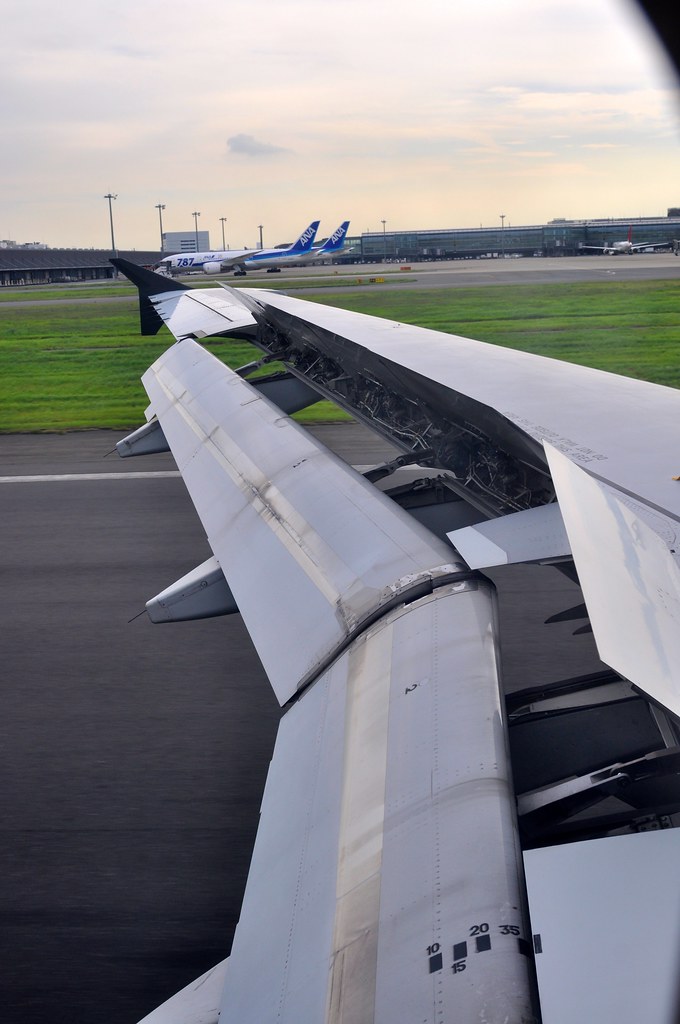 From the photo above, you can also see that the Flaps are deployed to the 35-degree position.
If an anomaly requiring a Go Around occurs after the aircraft has touched down, as long as the engine Thrust Levers are pushed forward, the Speedbrake Lever will automatically move to the Down position, retracting the Speedbrakes so they do not hinder the Go Around.
Next, the aircraft’s Autobrake begins to work. According to the setting selected during the Approach Briefing, the brake hubs on the main wheels use friction to reduce wheel rotation speed, achieving the braking effect. It is important to note that if the pilot inadvertently steps on the brakes on the rudder pedals, the Autobrake will immediately disengage.
After the pilot verifies that the Speedbrake Lever is in the UP (deployed) position and that the Autobrake is working correctly, the Reverse Thrust can be deployed. The purpose of Reverse Thrust is to reduce body speed, shorten the rollout distance, reduce brake wear, and decrease time spent on the Runway. Therefore, if the Runway is long enough, the weather is good, and traffic is light, Reverse Thrust is not indispensable.
The term Reverse Thrust (also called Thrust Reverser) is easily misunderstood because literally,
it implies the engine rotates in reverse, expelling air from front to back to slow down.
In reality, Reverse Thrust is achieved by deflecting the exhaust jet forward.
Due to the design of jet engines, reverse rotation is impossible, so a Thrust Reverser is used to deflect the exhaust airflow forward.
When a Turbofan engine’s Thrust Reverser is deployed, the engine principle is still pushing forward,
but because the majority of a turbofan engine’s Thrust comes from the fan—especially high-bypass ratio jet engines where about 70% of Thrust comes from the fan—
the drag caused by the reversed airflow still overcomes the turbine’s Thrust, achieving the goal of deceleration.

Passengers hear the engine noise increase again after landing; this sound is the noise of the engine Reverse Thrust.
Below, let’s look at photos of engines deploying Reverse Thrust.
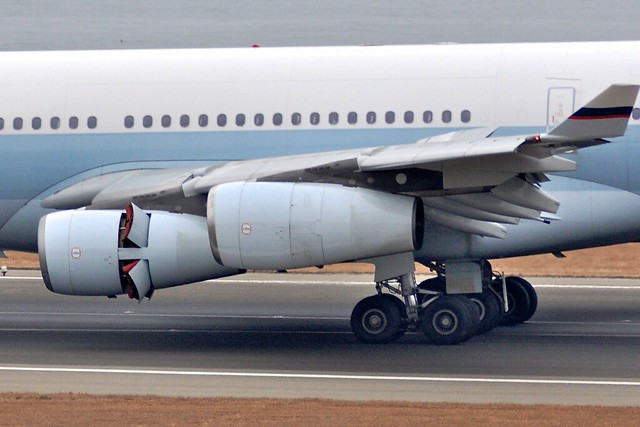 This photo was taken at Nagoya Chubu Centrair International Airport, the aircraft is a Cathay Pacific Airbus A340,
equipped with CFM56-5C4 engines, featuring a petal-type Thrust Reverser.
When the Thrust Reverser is activated, the blocker doors open, directing the air from the bypass duct outwards and generating reverse thrust.
This photo was taken at Nagoya Chubu Centrair International Airport, the aircraft is a Cathay Pacific Airbus A340,
equipped with CFM56-5C4 engines, featuring a petal-type Thrust Reverser.
When the Thrust Reverser is activated, the blocker doors open, directing the air from the bypass duct outwards and generating reverse thrust.
Let’s look at another shape of Thrust Reverser.
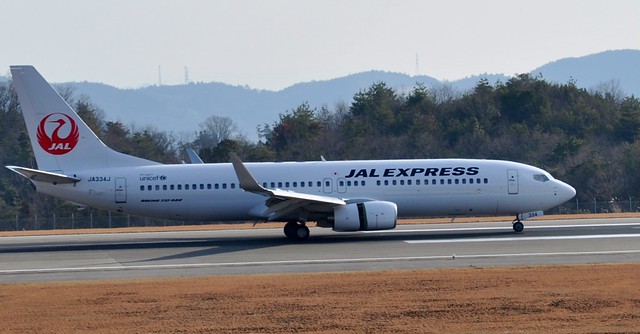
This is a Boeing 737-800 I photographed at Hiroshima Airport,
equipped with CFM56-7B24 engines, featuring a target-type (bucket) Thrust Reverser.
When the Thrust Reverser is activated, the sleeve slides backward, directing the air from the bypass duct outwards and generating reverse thrust.
The Reverse Thrust Lever is located in front of the Thrust Lever. Its shape is basically the same as the Thrust Lever, but it is one size smaller.
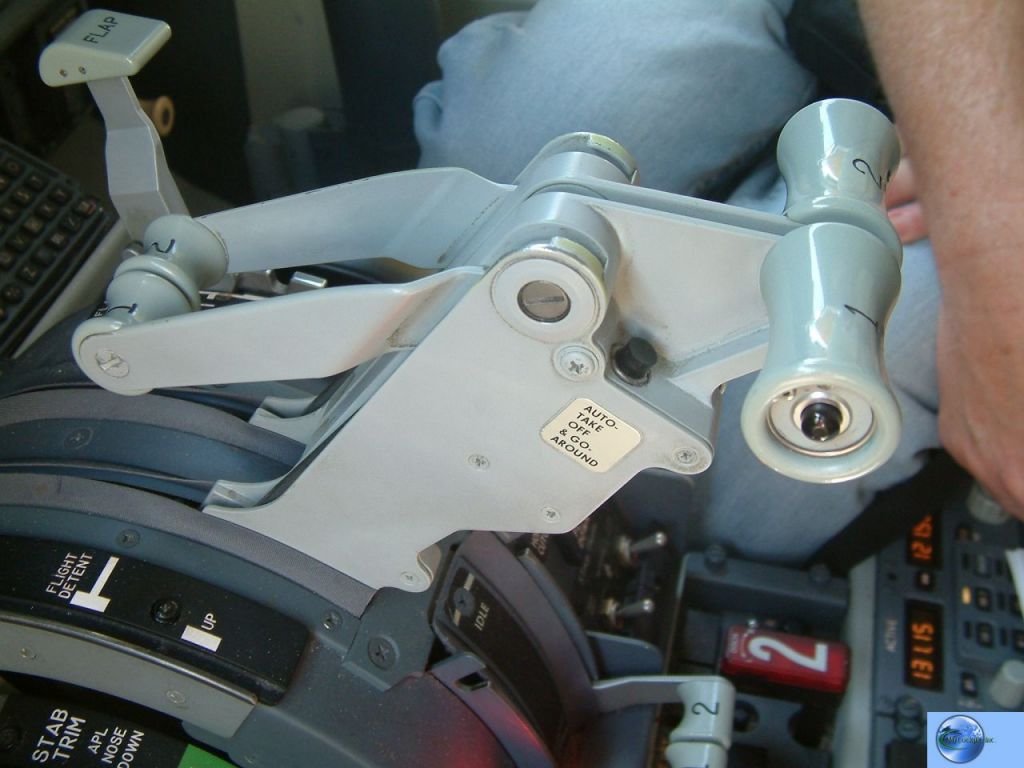 To use it, the pilot must lift the Reverse Thrust Lever to the detent and hold it briefly until the lock releases. Then reverse thrust can be used as needed.
When the aircraft speed slows to 60 knots, the First Officer calls out “60 knots”, and the Captain begins to lower the Reverse Thrust Levers, smoothly returning the levers to the reverse idle detent before reaching taxi speed. After the engines reach reverse idle, the levers are fully stowed.
After this, before taxi speed (below 10 knots), the pilot gently presses the brake pedals on the rudder pedals to disarm Autobrake, then uses manual braking as needed to control taxi speed. Disarming Autobrake is easy to say but very difficult to do; both timing and force must be mastered proficiently. If pressed too hard, the aircraft brakes abruptly, causing panic or even injury to passengers. If pressed too lightly, the Autobrake may not disarm, and the aircraft will be firmly stopped by the Autobrake system on the Runway. These situations should be strenuously avoided.
End
Prev: Go Around TOC: Table of Contents Next: After Landing Procedure
2017/10/14 Recording an explanation regarding the A320 from 壓力與責任的承擔
「空中巴士在正常情形下的降落模式,不再幫機師做自動配平的工作。」華勒斯說,「這也是容易混淆新手的原因。」在爬升、巡航、下降的過程中,飛行電腦都可以幫機師做自動配平的工作,讓機師的操縱更簡單省力,但是在飛機下降通過50呎高度的時候,飛行電腦會轉換成降落模式,不僅不再幫機師做自動配平,不僅如此,通過30呎高度後,還會強制飛機的水平安定舵往下轉,這會造成機頭會往下,而機師要做的就是將操縱桿往後扳去抵銷機頭下降的力量,讓飛機操控起來和傳統飛機一樣。「操控的技巧和傳統飛機一樣,」華勒斯解釋,「此時飛機完全操控在機師手上,飛行電腦不再予以輔助。」因此在平漂的階段,若是發生太早而飛機掛在空中時,要做的是把操縱桿鬆開或放一點,因為飛機已經有一個水平安定面往下的動作,機頭自然會往下;若是將操縱桿往下推,會造成飛機的下降率過大,在低高度的時候會很危險,因為操縱桿需要往後扳的更大,才能減少下降率。
空中巴士的飛機最不適合新手來飛,因為這是線傳操控的飛機,飛行員在側向操縱桿上得不到飛機最真實的反應,於是儀表掃描的速度變得非常重要。特別是在風大的時候,飛機常常被吹偏,如果是儀表掃描速度不夠快,會來不及做反應。「飛機已經偏了才去修正,往往都太遲,」華勒斯解釋道,「因為線傳操控的飛機需要一點時間反應,讓電子訊號傳到液壓系統,然後控制面才會移動。」不像傳統小飛機,依靠鋼纜去拉動控制面,可以立即達到修正的效果。
新手飛行員的儀表掃瞄速度比較慢,太慢修正的結果,會造成飛機一直在不正常的下滑道上,飛機忽高忽低、左右偏移很容易造成不穩定進場;或是在低高度時,為了要追回正常下滑道,用過大的下降率修正;或是為了怕重落地,反而太早平漂,讓飛機在低空停滯,下降率減為零,直到速度掉了動能少了,才變成自由落體般的掉下來。
「A good landing comes from a good approach!」華勒斯說,「是以前一個資深機長分享的飛行訣竅。」這句話一點都沒錯,一般乘客只能感受到降落的瞬間,主輪接觸跑道的力道去評斷機師的技術,但只有全程坐在駕駛艙內的機師可以知道整趟到底是不是一個好的進場。