Installation and Testing of GMAP FOR X-PLANE 2.0 New Version
A long time ago, I wrote an article introducing the plugin: Google Map Display GMAP FOR X-PLANE (FREE MOVING MAP). However, since this plugin has been updated, the installation method is now significantly different from before, so here is a brief record of how to use the new version.
First, download the communication plugin Network Pack X-Plane Plugin 1.1. Click the link for Network Pack X-Plane Plugin 1.1 to get the download package. After unzipping, you will find a directory named FSWidgetsGMap. Move this directory to the X-Plane plugins directory: X-Plane/Resources/plugins. The path will look like this: X-Plane/Resources/plugins/FSWidgetsGMap.
Next, download GMap for X-Plane (Mac Version) 2.0 from the Download Page. After unzipping, you will see two files: gmap_net.txt FSWidgets GMap.app
Now, launch X-Plane 10. Find FSWidgets in the Plugins menu and click it to see the following information:
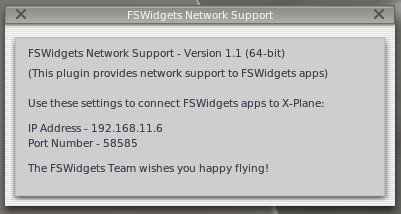 Record the IP address and port number, then modify the contents of gmap_net.txt as follows:
192.168.11.6|58585
Record the IP address and port number, then modify the contents of gmap_net.txt as follows:
192.168.11.6|58585
You can now launch FSWidgets GMap.app to display the Google Map. You should see the word “Connected” in the title bar.
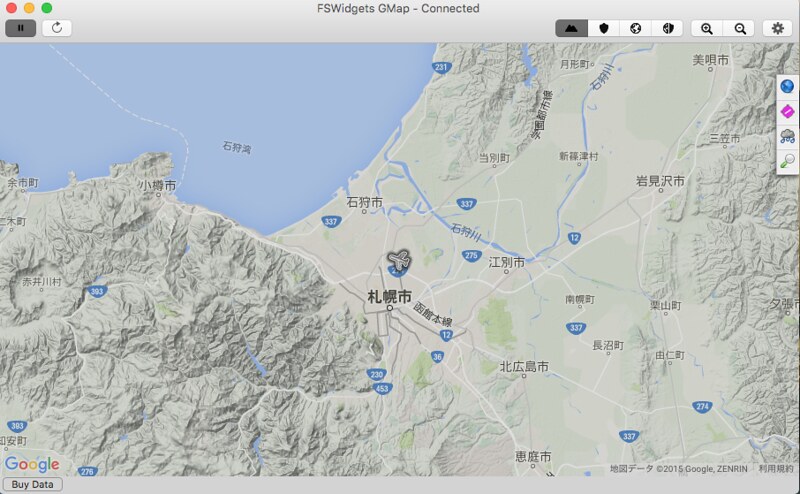 Click the Play button in the top left corner of the map, and FSWidgets GMap will connect to X-Plane.
You can see that the flight is currently near Sapporo, Hokkaido.
Click the Play button in the top left corner of the map, and FSWidgets GMap will connect to X-Plane.
You can see that the flight is currently near Sapporo, Hokkaido.
End