Basic Practice of Turns
— Key Points —
Since writing the introduction to slip and skid, I realized it had been a long time since I practiced basic maneuvers. So, I spent a few hours flying turns in the Cessna 172 on X-Plane 10, focusing on my personal weaknesses:
- Adjusting rudder pressure based on attitude to maintain a coordinated Turn, avoiding entering a slip or skid state.
- Maintaining a stable altitude, specifically ensuring no altitude loss.
- Coordinating yoke and rudder operations (using hands and feet simultaneously) with smooth inputs.
- Using external visual references combined with instruments, ensuring the scan doesn’t fixate on a single point.
- Not just following instructions mechanically during flight; be aware of the lift and gravity components during a Turn, and the effects of Thrust, propeller slipstream, P-Factor, and gyroscopic precession on flight attitude.
- Keep the body posture upright; be mindful of unconscious tilting of the body or head.
- Breathe deeply occasionally to relax the shoulders and release tension from the control pressures on hands and feet.
— Entering the Turn —
Taking a left Turn from Level Flight as an example: to establish the bank angle, first turn the yoke to the left. At the same time, apply left rudder pedal to keep the turn coordinated and prevent the fuselage from slipping.
Generally, a bank angle under 20 degrees is considered a gentle turn. Due to the aircraft’s stability design, in this state, the aircraft has a tendency to roll back toward the neutral position (wings level). Therefore, constant control pressure is required to maintain the bank, making this angle less than ideal for practice and general flight.
A bank angle exceeding 45 degrees is a steep turn. In this state, due to the difference in airflow velocity across the wings (the outside wing moves faster than the inside), the Lift is greater on the outside (right in a left turn) than the inside. This causes the aircraft to tend to over-bank. Constant back-pressure adjustment is needed here as well, making it unsuitable for general flight training.
The best bank angle should be between 30 and 35 degrees—a normal turn. If conditions are right, you could practically take your hands off the controls in this state, and the aircraft will maintain the coordinated turn.
Referring to the gyroscopic precession mentioned earlier, when initiating a left Turn, the nose has a tendency to yaw upward. Of course, this relates to engine power output; if Thrust is high, this upward yaw is significant. During practice, based on the actual situation, if the deviation is significant, apply appropriate forward stick pressure to maintain altitude.
 How do you remember the direction of precession deviation? The image above is a great memory aid. Looking at the propeller rotation direction from the cockpit (most US aircraft rotate clockwise), follow the arrows—top-left, bottom-right. When turning left, the deviation is upward. Easy to remember, right?
Control inputs (yoke and rudder) when turning must never be abrupt; think of it as gradually applying pressure. You may be unsure of the control input required at first, but after multiple practice sessions, you should memorize the approximate force needed for hands and feet, as well as the distance the yoke travels. Once this habit is formed, you won’t need to stare constantly at the instruments or external references; instead, you can rely on memory—or muscle memory—to achieve the appropriate angle.
— During the Turn —
As the aircraft enters the turn and approaches the target bank of 30 degrees, consider the lead-in point and neutralize the ailerons to stop the bank. For a 30-degree left turn, I typically start to apply right aileron (neutralizing/rolling out) around 25 degrees.
Gyroscopic effects also occur when neutralizing; when applying right aileron, the nose tends to yaw downward, so some backward stick pressure is needed depending on the situation.
During the turn, the wing provides Lift, but only a component of it acts vertically. To avoid losing altitude, apply appropriate back pressure to increase the angle of attack.
Once established in a stable turn, check for slip/skid, check altitude, check Heading, and scan for external traffic. Of course, you must maintain back-pressure on the yoke and pressure on the rudder, staying relaxed but firm. Adapting to this sequence of operations takes time.
Another factor to be aware of in a stable turn is the asymmetry of the propeller effect. Taking a left turn as an example: the turning radius is different for the left and right sides of the propeller. The speed on the right (Vr) is greater than on the left (Vl). Imagine the propeller cross-section as a wing; the angle between the airflow and the propeller blade (angle of attack) differs. The angle of attack is greater on the left (αl > αr), meaning the thrust (Lift) generated by the left side is greater than the right, creating an imbalance.
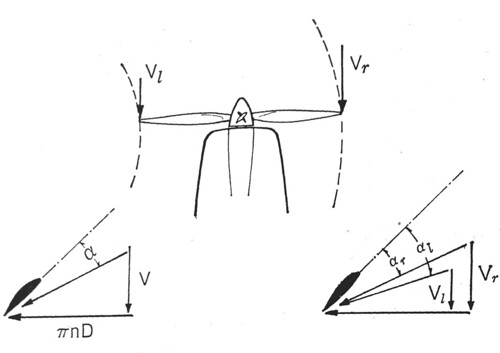
In a left turn, due to this imbalance, a nose-down pitching moment is produced. Therefore, apply appropriate back pressure to maintain altitude. (In a right turn, the opposite is true: a nose-up effect is produced, which conveniently counteracts the loss of vertical Lift component, making control easier.)
 The memory aid for the propeller effect is best visualized with the diagram. It is similar to the precession diagram above, but the left/right positions are reversed. Thus, in a left turn, the nose yaws downward. Easy to remember.
— Returning to Level Flight —
For example, if the target magnetic Heading is 300 degrees, you should prepare to roll out (right turn) when reaching 330 degrees. Naturally, the rudder must be used simultaneously; relax the left foot and apply right rudder pressure to maintain a coordinated turn.
As mentioned, initiating the right turn causes gyroscopic precession that yaws the nose downward, so apply slight back pressure to maintain altitude.
As you approach Level Flight, neutralize the controls (apply left aileron pressure). The operation here is the same as before.
— Turn Practice Methods —
When practicing turns in X-Plane 10, a convenient feature is the map mode. It allows you to check your flight Track and altitude at any time. The smoothness of your arc and any altitude loss are immediately visible on the map.
For specific practice methods, start with single-direction 360-degree or 720-degree turns. Once familiar, practice “S-turns.” This exercises continuous turning technique in both directions. It increases difficulty but is very effective.
Once Level Flight turns are mastered, you need to learn climbing turns and descending turns. I will write about that when I have time.
End