Introduction to Setting Weather Conditions in X-Plane 10
X-Plane 10 features powerful weather simulation capabilities. Not only can it download the latest real-world weather from the internet, but it also allows for the manual configuration of wind, clouds, visibility, wind shear, thermal updrafts, runway conditions, and more. Below is a brief guide on how to use these features.
To configure these settings, click on the Environment / Weather menu to open the settings page,
 as shown in the image above.
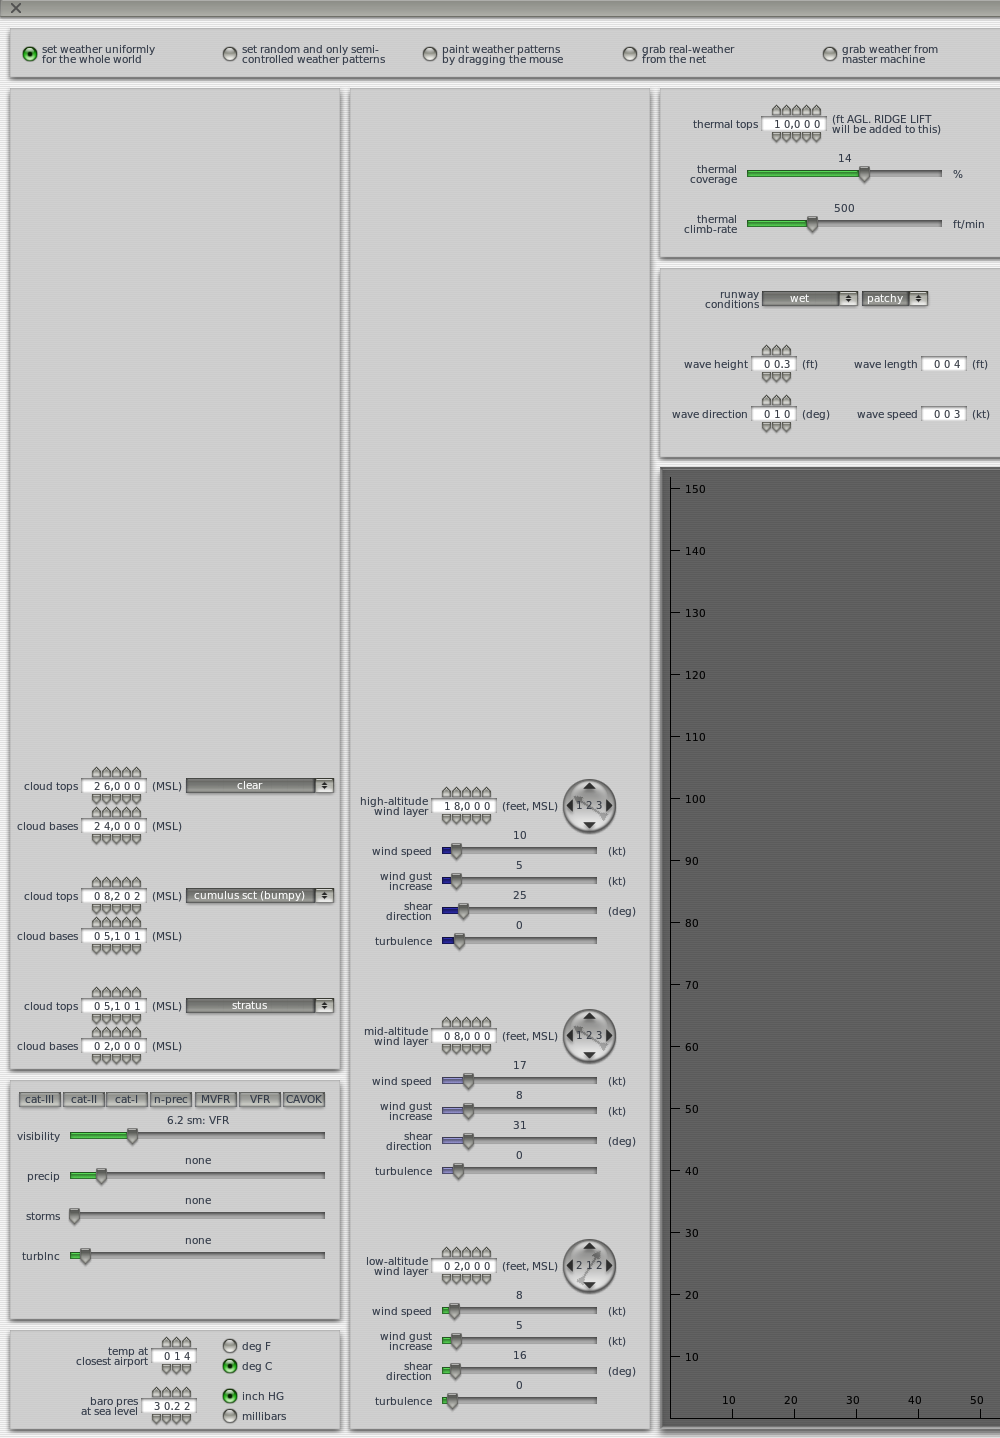
At the very top of the settings page is the basic mode section. From left to right:
- set weather uniformly for the whole world: This is the most powerful manual configuration mode. Every single data point can be set manually, which is extremely convenient for targeted training, such as instrument navigation in clouds or crosswind takeoffs and landings. I will explain the specific options available in this fully manual mode below.
- set random and only semi-controlled weather patterns: This is a semi-manual mode where you can select specific weather conditions, and the system randomly generates the rest.
- paint weather pattern by dragging the mouse: This allows you to set weather on the map using your mouse. I haven’t used this feature personally.
- grab real-weather from the net: Real-time global weather simulation. This is the option I usually use.
- grab weather from master machine: Gets weather from the host machine during networked flight. I have never used this function.
Now let’s look at the settings in the left column.
The box in the upper-left is for cloud settings. You can set up to a maximum of three cloud layers. For each layer, you can set the cloud bases (cloud top height), cloud tops (cloud base height), and cloud type. Referring to the image above, you can see two layers are configured here: a lower layer of stratus clouds from 2,000 to 5,100 feet, and a layer of scattered cumulus (cumulus sct) from 5,100 to 8,200 feet.
The middle-left section covers weather types. You can choose options like clear skies, Visual Flight Rules (VFR - Visual Flight Rules), Marginal VFR, Category I Instrument Landing System (CAT I) weather, Category II (CAT II), etc. It also allows for individual configuration of data such as visibility, precip (precipitation), storms, and turblnc (turbulence).
The lower-left section is for setting weather at nearby airports, including temperature and altimeter setting.
Next, let’s look at the settings in the center column. Here, the wind can be divided into up to three layers: High, Medium, and Low. Detailed data such as the altitude, wind direction, wind speed, gusts, wind shear direction, and turbulence for each layer can be set manually. For example, in the image, the low-level wind is set at an altitude of 2,000 feet, with a wind direction of 212°, speed of 8 knots, gust variation of 5 knots, wind shear direction of 16°, and turbulence of 0.
Finally, the section on the right. The upper-right is for thermal updraft settings. In the image above, the thermal top is set to 10,000 feet, coverage is 14%, and the climb rate is 500 feet/min. If the needle on your Altimeter suddenly jumps upward during flight, don’t be alarmed; you have encountered an updraft.
The lower-right section contains Runway conditions, such as dry or wet settings. At the very bottom are wave conditions. I assume this is for practicing ditching at sea. It includes data like wave height, direction, and speed. However, I haven’t tried ditching yet, so I don’t know how well this feature simulates it.
End