A Discussion on Trim Tab Control Methods
1. What is Trim?
Trim tabs are devices used to fine-tune the three primary flight controls (Ailerons, Rudder, Elevator). While large aircraft typically feature all three types, small aircraft are often only equipped with Elevator Trim. By adjusting the position of the trim tab, the control pressure on the three controls can be reduced to zero. This means the pilot no longer feels any resistance in their hands—a state known as being “trimmed out.” This serves to reduce fatigue during flight. At this point, even if the pilot removes their hands from the yoke, the aircraft will continue to fly normally and stably.
The following summary focuses on elevator trim operating methods.
2. The Necessity of Trim
Many pilots believe that it is good practice to feel some degree of control pressure during flight.
Generally speaking, when the flight configuration needs to change frequently—such as during steep turns or when constantly adjusting the throttle—it is virtually impossible to keep the aircraft in a “trimmed out” state. Therefore, to avoid letting trim adjustments interfere with other basic operations, retaining a certain amount of tactile feedback is helpful for maintaining control of the flight state. Especially during steep turns, flying with the trim setting from before the roll-in allows for better appreciation of the control pressures. Furthermore, if you use elevator trim to raise the nose but forget to return the trim to its previous state when rolling out, the aircraft will pitch up aggressively, causing instability. Therefore, during steep turns, you should persist in direct control of the aircraft, even if the control forces are heavy.
However, during cruise or stable flight phases, actively using trim to achieve a “trimmed out” state is the correct technique. After all, flying is not a wrist-strength exercise. Plus, it allows the pilot to devote more attention to observing weather and traffic outside, thereby improving flight safety.
3. Rough Trim
Rough trim refers to the method of continuously and coarsely adjusting the trim to relieve control pressure as the aircraft’s speed, altitude, and other states change. Therefore, when the pilot feels pressure, they can adjust the trim wheel roughly at any time to eliminate the force.
For example, during the transition from cruise to low-speed flight: from reducing power, to lowering the landing gear and flaps, until the speed stabilizes. You can use rough trim several times as the control pressure changes to return the aircraft to a trimmed state. While doing it perfectly in one go is ideal, beginners often lack the experience, so splitting it into several operations is perfectly fine. As experience grows, the number of adjustments needed will naturally decrease.
4. Re-trim
Whenever the aircraft changes flight configuration and enters a stable state, you should adjust the trim again. This ensures the aircraft can maintain its current attitude even with hands off. This procedure is called re-trim. Examples include transitioning from a Climb to cruise, or from cruise to a Descent.
Generally speaking, re-trimming refers to the precise adjustment made to finally achieve a “trimmed out” state, usually after several rough trims. Of course, re-trimming during attitude changes like turns is meaningless; in those situations, you should rely on the direct control method mentioned earlier.
Re-trim can also be used during the landing phase. Since the aircraft’s attitude and speed are stable during the approach, using re-trim is feasible and recommended even during the final approach stage. However, be careful not to over-trim. For instance, if the pitch angle is too high and you have to push the control column forward to land during the flare, that is incorrect operation. Additionally, if a Go Around (G/A) is required, advancing the throttle to maximum with excessive nose-up trim could induce a Stall. Therefore, never forget to return the trim to a takeoff setting during a Go Around.
5. Flying with Trim
If you use trim to control pitch instead of the elevator during climbs or descents, you can achieve the same objective. This method is often called “trim flying.” The advantage of this method is that it allows for more delicate and smooth control inputs compared to direct manipulation. Furthermore, if a mechanical failure occurs in the elevator, trim can be used alone to safely fly the aircraft back to the airport. Thus, we can consider trim to be an effective control device.
6. Pre-set Trim
Aircraft flight manuals usually list trim values for takeoff and landing, so checklists include a “Trim Set” item. For example, on base leg, you might be required to lower the landing gear and simultaneously set the elevator trim to 10. Of course, the value “10” is an approximation; you should adjust the trim to remove control pressure based on the actual conditions.
7. Trim After Flaps Extension
When extending flaps during approach, Lift increases, the pitch angle changes, and the nose begins to rise. Do not use trim immediately at this moment, as the flight attitude has not yet stabilized. The correct method is to apply forward pressure on the yoke to lower the pitch by about 2-3 degrees. Wait until the flap extension is fully complete (this takes at least a few seconds), then relax the control pressure. After that, wait for the aircraft attitude to stabilize, and then apply trim as necessary. Also, note that you should not reduce the throttle here; reducing power after increasing Drag (by deploying flaps) is equivalent to suicide…
For flight simulation enthusiasts, detailed manuals might not always be available. Therefore, it is advisable to test fly each aircraft model first, record the trim setting values for various flight states, and save them for future use.
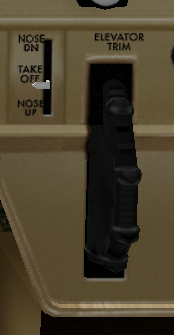
I am currently using this trim wheel (Saitek Pro Flight Cessna Trim Wheel), a collaboration product between Saitek and Cessna. I have used it for nearly two years, and the quality is quite good.
SAITEK - PC PRO FLIGHT TRIM WHEEL
End