Saitek PRO Flight Radio Panel Setup
Recently added a new piece of hardware—the Saitek PRO Flight Radio Panel, as shown below:
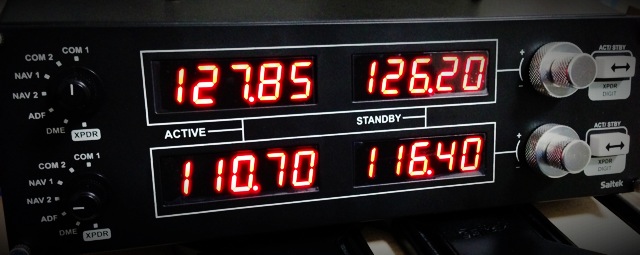
Its specific function allows you to adjust the following frequencies: COM1/COM2/NAV1/NAV2, DME/ADF/XPDR. Each frequency features ACTIVE and STANDBY displays, and you can swap between them using the toggle button on the right.
The reason I bought this device is that I found it very inconvenient to adjust frequencies with a mouse while constantly checking the flight chart. With this gadget, I get a complete sense of operating independently of the computer, which significantly enhances the realism of the flight again.
The radio navigation panel comes with a CD-ROM, but since it’s for Windows, I tossed it aside without even opening it. Because I play X-Plane on a Mac, I just need to install the Xsaitekpanels (lin+win+mac+32/64) Plugin.
Installation is also very convenient. Just download and extract the Plugin, copy the Xsaitekpanels directory into the ‘plugins’ folder within X-Plane’s Resources directory. After restarting X-Plane, open the Plugins menu; you will see Xsaitekpanels. There are some settings inside, but basically, no special configuration is required. Just casually adjust the knobs on the panel, and the numbers will display on the Radio Panel. Additionally, there is an XsaitekpanelsUsersManual.pdf instruction file inside the compressed archive, which contains more specific explanations. This Plugin not only supports the Radio Panel but can also support Saitek’s Switch Panel, Multi Panel, and Backlight Information Panel. If you have these devices, you can manage them all using this single Plugin.

End