X-Plane 10 747-400 Takeoff and Landing, Air Traffic Control ATC, Instrument Flight Rules IFR Practice Beginner Full Tutorial
X-Plane 11 is out now, please check the latest coverage X-Plane 11 Information Summary!
Today, we will use the Boeing 747-400 to perform an Instrument Flight Rules (IFR) flight from Tokyo Haneda Airport (RJTT) to Hokkaido New Chitose Airport (RJCC). This will help you better understand the ATC functions in X-Plane 10 and the usage of the Boeing 747-400’s 3D cockpit. This article is adapted from the free support documentation provided by the Japanese software dealer MGJ SHOP. All graphics in this article were created by me.
#Updated on May 25, 2013# Today, I re-executed the flight mission on X-Plane version 10.21. From takeoff Climb to cruise Descent and ILS blind landing, there were no issues. Additionally, I found that the ATC timing in the new version 10.21 is much improved compared to the older version, so I have made slight modifications to the article.
1 Flight Plan Creation First, select the aircraft. Use the Aircraft > Open Aircraft menu to open Heavy Metal/B747 400 United/747-400 United.acf. Then, open the airport selection via Location > Select Global Airport, select Tokyo Haneda Airport (RJTT), and you can choose any RAMP START position on the Apron.
#Further Reading: Summary of X-Plane flight plan route setting methods Airline Pilot Secrets 1.3 Pre-flight Briefing & Flight Plan Introduction
Before filing the flight plan, listen to the ATIS (Automatic Terminal Information Service) first. Use the Shift + 9 or Shift + 0 keys to move your viewpoint.
You can find the radio stack near the right hand side of the seat. Use the O key to lock the view, use the mouse to set the band to AM, set the frequency to 128.80, and press the ⇔ key (swap standby/active) to activate it, as shown below.
 If you cannot see the image above, please refer to the article Solution for not seeing image files – Flickr connection issues for simple PC settings to solve it.
#Further Reading: About ATIS Automatic Terminal Information Service Organization of Haneda Airport Air Traffic Control Frequencies
ATC frequencies for each airport can be found in the Local Map command under the Location menu. As shown in the figure below, click on the circle at RJTT to display them.
-thumb-650x540.png)
Also, if you don’t understand the ATIS content, it’s okay because the text information will be displayed on the screen simultaneously, as shown below.

What is ATIS? ATIS stands for Automatic Terminal Information Service. You can refer to another article on this site to understand its format and how to listen to it.
If your software cannot update real-time weather information, you can refer to this TIPS to see if it solves the problem.
Next, set the Altimeter setting based on the airport broadcast information. For example, if the ATIS gives an Altimeter of 3018,
use the BARO knob on the left side of the autopilot to adjust it, as shown in the figure below.
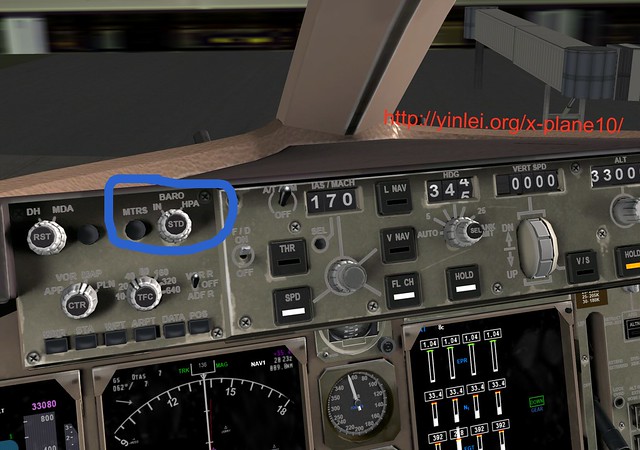
The adjusted data is displayed in the lower right corner of the Primary Flight Display (PFD). You can see the green number 3018 has been set.
Also, in the PFD below, the Altimeter shows between 20 and 40. For Haneda Airport, which is at sea level, this data should be normal.

#Further Reading: Usage of the Barometric Altimeter Airline Pilot Secrets 4.3 Flight Altitude, Air Pressure, and Maximum Flight Altitude
The next step is to file the flight plan. Press the Enter key to open the ATC menu, enter the Departure airport RJTT, Cruise Altitude 34000, and Destination RJCC.
The information entered in the route field depends on the wind direction of the day.
When there is a North Wind, using Runways 34L/04/34R/05, you need to enter:
3537N13950E 3537N13958E 3544N13958E SYE JD 3830N14012E HANKA MWE CHE
When there is a South Wind, using Runways 16R/22/16L/23, you need to enter:
3526N13956E 3530N14000E 3537N13958E 3544N13958E SYE JD 3830N14012E HANKA MWE CHE
Click the File button to complete the plan.
-thumb-640x356.png)
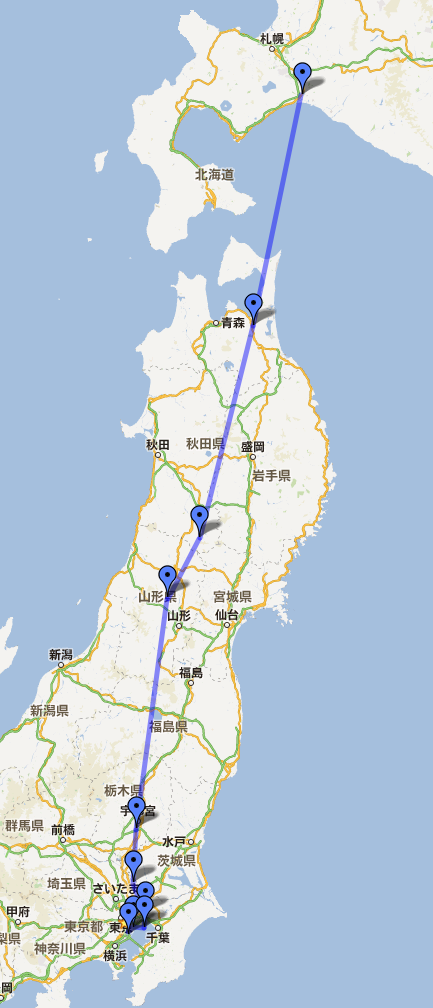
The figure below shows the flight route from Haneda Airport to New Chitose Airport in Hokkaido:
 For Waypoints on the route, you can use the opennav website to query specific waypoint information.
For example, after entering information like “SYE” and searching, the website will display the latitude, longitude, and map of that waypoint, as well as a list of nearby waypoints and navigation stations. It is very convenient.
For Waypoints on the route, you can use the opennav website to query specific waypoint information.
For example, after entering information like “SYE” and searching, the website will display the latitude, longitude, and map of that waypoint, as well as a list of nearby waypoints and navigation stations. It is very convenient.
#Further Reading: Airline Pilot Secrets 4.1 Basic Knowledge of Navigation
2 Flight Preparation
First, submit the flight plan. Tune the radio frequency to Haneda Clearance Delivery (CLD) 121.82MHz.
Press the Enter key to open the ATC menu and select Request Clearance.
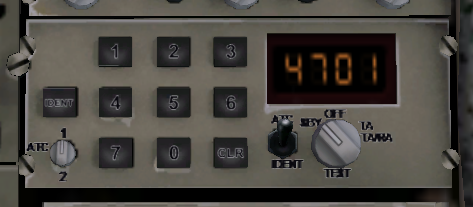
After receiving the response “Cleared IFR to RJCC as filed maintain FL340, squawk 4701”,
press Enter again and select Readback Transmission.
 At the same time, enter the squawk code 4701 into the Transponder (located immediately to the left of the co-pilot seat).
If you are not very familiar with Air Traffic Control (ATC), I recommend you read the following two articles on this site for an introductory understanding. These articles are adapted from a Japanese book called “Captain’s Seat” (機長席), which details the entire ATC conversation for a flight from Haneda Airport to New Chitose Airport in Hokkaido. It is an excellent ATC introductory resource. Air Traffic Control (ATC) Basic Knowledge -1 Air Traffic Control (ATC) Basic Knowledge -2
If you are not familiar with how to use ATC in X-Plane 10, you can refer to this article on this site to get started.
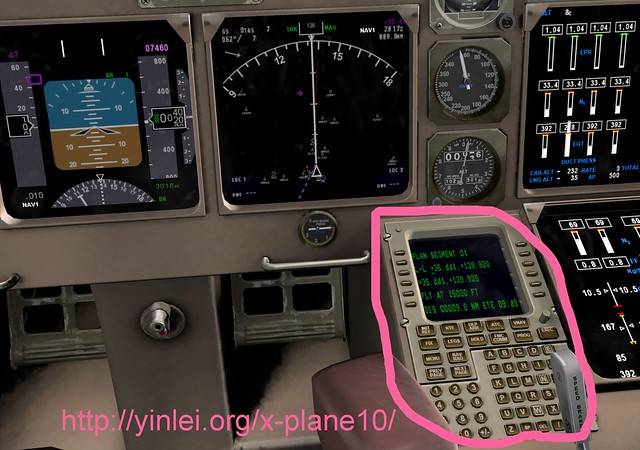
Next, you need to enter the Waypoints into the FMS (Flight Management System). Enter the following information via the CDU (Control Display Unit), as shown in the figure below.
The specific input method is as follows. Text in square brackets represents keys on the CDU. North Wind: [INIT REF] [DEP ARR] RJTT [NEXT PAGE] [PROG] 035.610 0139.836 [NEXT PAGE] [PROG] 035.609 0139.960 [NEXT PAGE] [PROG] 035.736 0139.968 [NEXT PAGE] [NAV RAD] SYE [NEXT PAGE] [RTE] JD [NEXT PAGE] [PROG] 038.505 0140.205 [NEXT PAGE] [FIX] HANKA [NEXT PAGE] [RTE] MWE [NEXT PAGE] [RTE] CHE [NEXT PAGE]
South Wind: [INIT REF] [DEP ARR] RJTT [NEXT PAGE] [PROG] 035.441 0139.928 [NEXT PAGE] [PROG] 035.495 0139.999 [NEXT PAGE] [PROG] 035.609 0139.960 [NEXT PAGE] [PROG] 035.736 0139.968 [NEXT PAGE] [NAV RAD] SYE [NEXT PAGE] [RTE] JD [NEXT PAGE] [PROG] 038.505 0140.205 [NEXT PAGE] [FIX] HANKA [NEXT PAGE] [RTE] MWE [NEXT PAGE] [RTE] CHE [NEXT PAGE]
Entering them one by one is indeed quite troublesome. You can download the already made route files directly from the URL below:
Route Files
After decompressing the file, copy RJTT-RJCC North.fms and RJTT-RJCC South.fms to the X-Plane 10/Output/FMS plans directory.
Then press the - key at the bottom left of the two rows of command keys on the CDU screen (i.e., the L6 key) to load the fms file.
Once the fms information is successfully entered, the red route information will be displayed on the Navigation Display (ND).
-thumb-640x657.png) For this flight, at an altitude of 500 feet when reaching the first Waypoint, select EXEC to enter the direct mode.
For this flight, at an altitude of 500 feet when reaching the first Waypoint, select EXEC to enter the direct mode.
#Further Reading: Airline Pilot Secrets 1.7 FMS CDU Settings Explained Airline Pilot Secrets 1.8 Pre-flight Procedures and Cockpit Interior
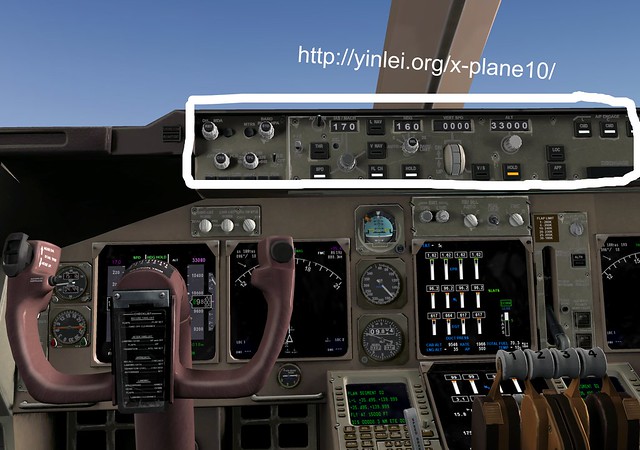
The next step is to set up the Autopilot. Although it will be engaged after reaching 500 feet after takeoff, it needs to be preset in advance.
Flight Director (F/D): ON
Altitude (ALT): 34000
Flight Level Change [FLCH]: ON
Heading (HDG): Not set yet
Heading Hold [HOLD]: ON
Speed Indication (IAS/MACH): 170 knots
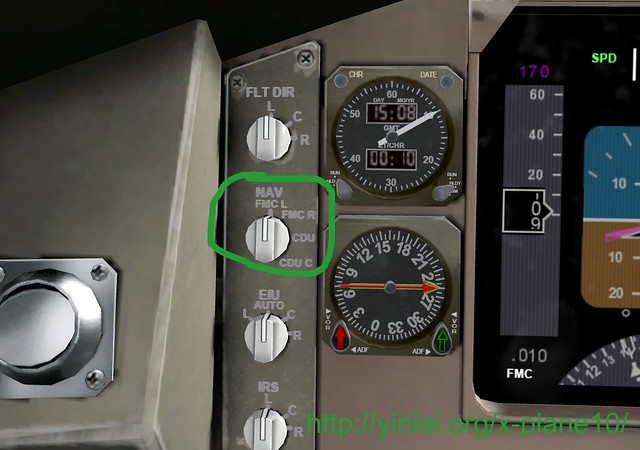
Navigation Mode (NAV): FMC L, which means selecting the left flight computer
As shown in the figure below.
3 Taxi
Tune the frequency to Haneda Ground Control (GND) 118.22MHz and request Request Taxi.
After receiving clearance, read it back, then start taxiing following the arrows on the ground.
Use the B key or the PARK BRAKE lever on the screen to release the brakes, and add a little throttle using the throttle quadrant or the F2 key.
The aircraft will start to move slowly. Be careful to observe the Ground Speed (GS) in the upper left of the ND and keep it below 20 knots.
At the same time, lower the Flaps to 10 degrees.
#Further Reading: Airline Pilot Secrets 2.4 Ground Taxi Route Airline Pilot Secrets 2.5 Operations During Taxi
4 Takeoff
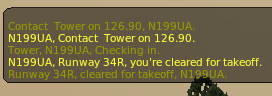
After taxiing to the Runway holding point, ATC Ground Control will automatically contact you to hand you over to the Tower: “Contact Tower on 118.20 or 126.90MHz”.
Adjust the frequency, press Enter again to start the ATC menu, and select checkin to wait for takeoff clearance.
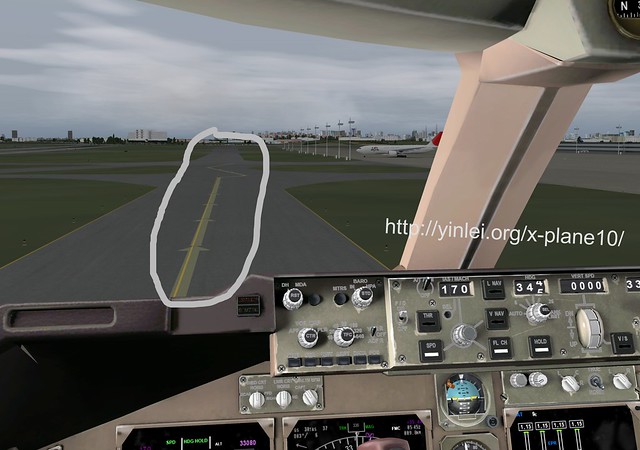
When you receive the clearance notification “You’re cleared for takeoff”, as shown below:
Taxi the aircraft to the centerline of the Runway and stop, then perform the following operations:
Set the Autopilot HDG to the Runway direction (for example, if using Runway 34R, you can set it to 340).
Confirm the Flaps position is lowered to 10 degrees.
Set the Transponder mode to TA/RA (using the knob below the squawk code 4701).
.png) Set the COM1 standby frequency to Control (Center) (135.95).
Start the ET (Elapsed Time) timer.
Then advance the throttle. Watch the EICAS N1 reach 70%, then release the brakes. Continue to advance the throttle until N1 reaches 96%. When the speed on the PFD reaches 150 knots (Vr), pull the nose up.
When the speed reaches 160 knots (V2), retract the landing gear.
Set the COM1 standby frequency to Control (Center) (135.95).
Start the ET (Elapsed Time) timer.
Then advance the throttle. Watch the EICAS N1 reach 70%, then release the brakes. Continue to advance the throttle until N1 reaches 96%. When the speed on the PFD reaches 150 knots (Vr), pull the nose up.
When the speed reaches 160 knots (V2), retract the landing gear.
#Further Reading: Various Speeds Airline Pilot Secrets 3.2 Takeoff Roll
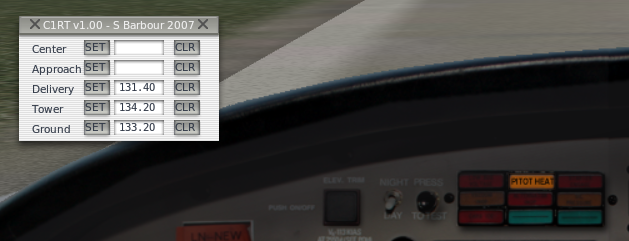
I’m sure you find it very annoying to constantly change frequencies for ATC while busy manipulating the flight.
Here is a recommended very useful Plugin, COM1RadioTuner,
which allows you to pre-register the frequencies you need to use before the flight, and simply press a button to use them.
5 Engage Autopilot
After the altitude reaches 500 feet, press the P key to Pause for a moment. Move the HDG knob so that the pink dotted line on the ND moves to the first Waypoint. Engage the autopilot by pressing the CMD key, then press P again to unpause. The aircraft will start to Turn. Then set the speed IAS/MACH to 200 knots to accelerate. When the speed reaches 190 knots, retract the Flaps to 5 degrees, then slightly reduce the throttle to bring N1 to 90%. The transition from takeoff thrust to climb thrust must be completed within 3 minutes, so keep an eye on the ET timer.
While doing the above actions, ATC will definitely hand you over to Center (Control), so even when you are in a rush, don’t forget to tune the frequency
(Since we already set the standby frequency earlier, just activate it with the ⇔ key) and Check-in.
 Also, make sure the Altimeter is set correctly.
After reaching 3000 feet, set the speed to 250 knots. After reaching 210 (Vfr1) knots, adjust the Flaps to 1 degree. After 230 knots, retract them fully.
Observe whether the aircraft has reached the FMC Waypoint. If there are no issues, you can hand over the flight route management to the FMC. Confirm that the first Waypoint is displayed on the CDU screen, press the EXEC button, and the red route on the ND will become a straight line. The navigation mode on the lower left of the PFD will display as FMC, so turn on the LNAV (Lateral Navigation) key on the autopilot. At this time, the green LNAV at the top of the PFD will light up, and the aircraft will start flying automatically along the red line. Now you can finally breathe a sigh of relief.
#Further Reading: Airline Pilot Secrets 3.4 Gear Up Airline Pilot Secrets 3.5 Engaging Autopilot Mode
The screenshot below shows the flight towards the 4th navigation point SYE. You can see the aircraft flying automatically along the route on the ND.
The white “FMC” text in the upper right of the ND indicates that the aircraft is under the control of the FMC (Flight Management Computer).
-thumb-640x704.png)
After climbing to 6000 feet, don’t forget to turn off the Landing and RWY Turnoff lights.
After climbing to 10000 feet, set the speed to 300 knots. After reaching 14000 feet, press STD in the middle of the BARO knob, which sets the Altimeter to standard atmospheric pressure (29.92 inHg). This altitude value varies by country; in Japan, it is 14000 feet.
Additionally, as altitude increases, the air becomes thinner and engine power decreases, so you need to increase N1 by about 2% for every 10,000 feet of climb. But do not exceed 97%. Real aircraft automatically adjust throttle, but X-Plane requires manual adjustment. When the altitude exceeds 30,000 feet, pay attention to the Mach number displayed in gray on the lower left of the PFD. Because the speed of sound decreases at high altitudes, the Mach number for the same speed will increase. If it exceeds 0.82, shockwaves may affect the aircraft. At this point, you can temporarily disengage the speed setting (SPD) key on the autopilot, press the black SEL button below IAS/MACH, then re-engage SPD. This will switch the speed display to Mach mode, and you can reset the speed to 082.
Upon reaching the cruise altitude of around 33,000 feet, the FLCH mode will disengage, the climb rate will gradually decrease, and with the current throttle, the aircraft will continue to accelerate. At this point, you can engage Auto Throttle. Set the speed to 085 and press the THR key. This will enter the optimum cruise speed (Mach 0.85) with automatic throttle adjustment. Upon reaching the cruise altitude, the ALT indication at the top of the PFD will turn green (it was white during the climb).
The screenshot below shows the PFD during cruise mode. You can see that the mode displays at the top center, “Auto Throttle (THR)”, “Lateral Navigation (LNAV)”, “Altitude Hold (ALT)”, etc., are all in normal mode. The pink FD (Flight Director) symbol in the center Attitude Indicator also overlaps with the black aircraft symbol, indicating that the aircraft’s attitude is completely consistent with the FMC settings.
I didn’t notice it while taking screenshots in a rush, but if you look closely at the figure below, the Mach number actually reached 0.844. Don’t exceed 0.82 when you are flying.
-thumb-640x590.png)
Generally, you will enter cruise mode 15 to 20 minutes after takeoff. As the Captain, you can turn off the seatbelt and no-smoking signs and tell passengers they can use the lavatories.
#Further Reading: Airline Pilot Secrets 4.2 Flight Speed Indicators and Maximum Flight Speed Airline Pilot Secrets 4.4 About Cruise Altitude Airline Pilot Secrets 4.5 About Cruise Speed
6 Cruise
You might be bored during the cruise, so use this time to enjoy the scenery. Don’t forget to use the various views; this is one of X-Plane 10’s great strengths. Also, you might find the waiting time annoying, so check out this article to learn how to adjust time.